

Although very inefficient for the user because in our case the 3D aspect is only aesthetic, I thought it might be interesting to experiment with Three.js and try to reproduce the same result in a 3D environment, without any physics engine such as Ammo.js or Physijs.
The goal here is not to provide a data visualisation for analysis and research, for 3D perspective will almost always distort your data and you’ll choose 2D over 3D most of the time. And if 2D computation time may be acceptable, it’s often way more time-consuming to render your animations in 3D via your web-browser.
The result here runs quite smoothly even on an “old” smartphone, with a reasonable amount of data (approximately 70 spheres in this exemple).
Here is a link to the experiment, note that you’ll need a web browser which support WebGL in order to see it.
The setup is simple: we create our meshes with a first loop called once, then we update the spheres positions with two loops called every frames of the animation. When each sphere has found its rest position, the setup stabilizes.
Scene
The scene is a basic setup if you’re familiar with Three.js. I used a THREE.AmbientLight mixed with a single THREE.PointLight, THREE.MeshLambertMaterial for the spheres and a simple THREE.PerspectiveCamera. The “parallax” effect is achieved by moving the camera on the x, y axis when the mouse moves on the screen. We’re listening to mousemove and click events for interaction.
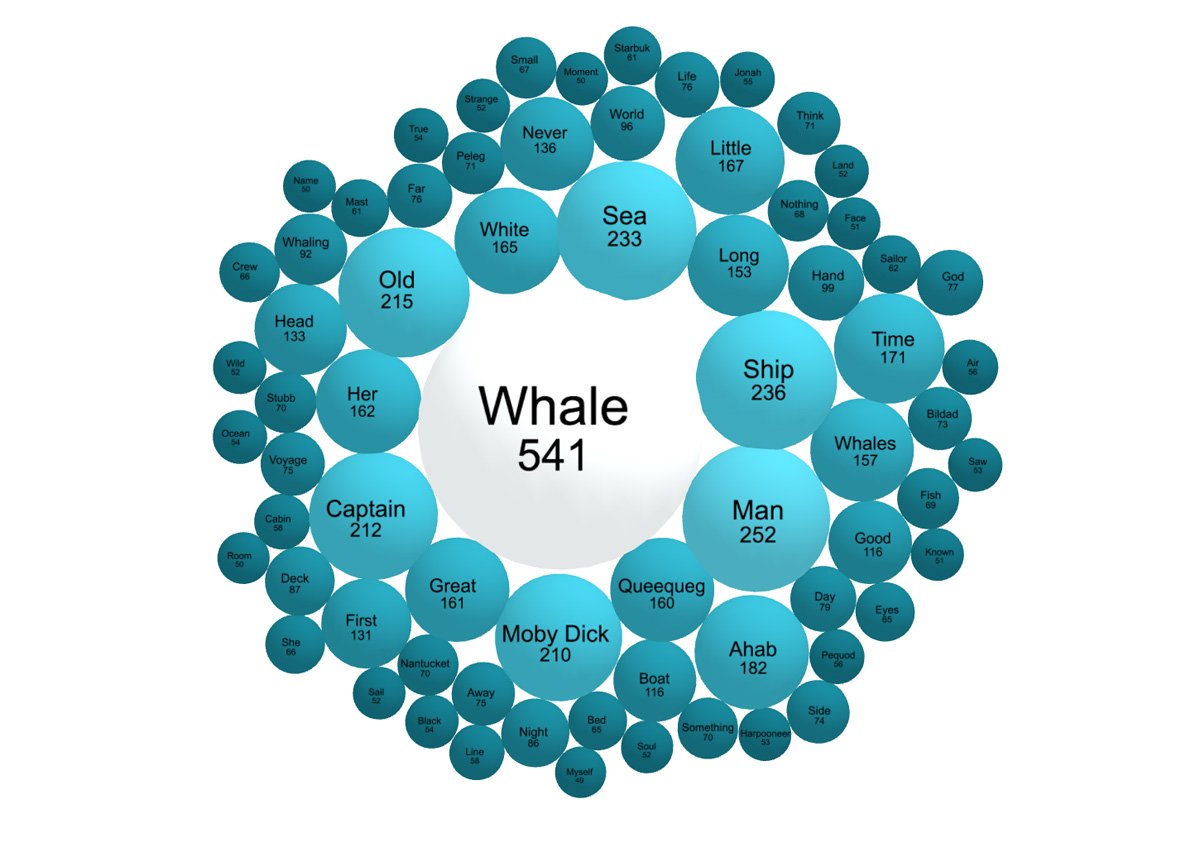
In this exemple we’ll visualize the most used (and relevant) words from Herman Melville’s masterpiece Moby Dick. Pairs of words/numbers are stored in an array directly in the html file like this:
{ size: 541, word: "Whale" }
Geometry
Creating the spheres is done by iterating to get the size of the geometry from the array. Then, the mesh is created, added to a THREE.Group, which is added to the scene.
A value of 18 segments for each sphere is enough in this case, using a finer resolution would start to slow down the animation.
for ( var i = 0; i < data.length; i++ ) {
	// create the spheres
	var bubbleSize = data[i].size/60+1;
	var geometry = new THREE.SphereGeometry( bubbleSize, 18, 18 );
	var material = new THREE.MeshLambertMaterial( { color: bubbleColor } );
	sphere = new THREE.Mesh( geometry, material );
}
To get our bubbleColor parameter, a value for the HSL color is generated for each sphere, using this quick trick (that surely can be improved):
var h = 189;
var s = Math.round( 90 - bubbleSize * 8 );
var l = Math.round( 10 + bubbleSize * 8 );
var bubbleColor = new THREE.Color( "hsl("+h+","+s+"%,"+l+"%)" );
The bigger the sphere is, the less it will be saturated and dark. This makes the most used word, “Whale”, to be colored like Captain Ahab’s deadly foe.
Then we arrange the spheres in a circle using their loop index, and rotate the setup so the white “Whale” sphere comes slightly from the top. The scale of the children in the group is set to 0, so the spheres can progressively scale up:
var clonerRadius = 50;
sphere.position.x = Math.cos( i-Math.PI / 2 ) * clonerRadius;
sphere.position.y = Math.sin( i-Math.PI / 2 ) * clonerRadius;
sphere.scale.set( 0, 0, 0 );
groupBubbles.add ( sphere );
The process is the same for the labels, we map a canevas texture with the word and the number associate with on a THREE.Sprite, add it to another THREE.Group and add the group to the scene.
Animation
We now have to create our two loops to animate the spheres.
The first loop will attract the spheres towards the center of the screen, scale them during the first frames for transition, and tell the labels to follow their paired geometry.
The scale-up transition of the spheres is achieved by simply adding a scaleFactor (I used a value of 0.02 in this case), each time the loop is called, to the group of sphere children. Using an if statement, we can stop the upscaling if the scale value is higher than 1.
var scaleFactor = 0.02;
if ( groupBubbles.children[i].scale.x < 1 ) {
	groupBubbles.children[i].scale.x += scaleFactor;
	groupBubbles.children[i].scale.y += scaleFactor;
	groupBubbles.children[i].scale.z += scaleFactor;
} else {
	groupBubbles.children[i].scale.set( 1, 1, 1);
}
To have our spheres rushing towards the center ( 0, 0, 0 ) of our scene, we first calculate the distance of each sphere from the center in the world space, then create a factorSpeed based on the size of the sphere multiplied by this distance. So the bigger the sphere is, the faster it will make it to the center. Then we translate the sphere towards the center using translateOnAxis and our factorSpeed each time the loop is called. The worldToLocal part is there to give a directional vector to the sphere local world based on a vector of the world space :
// run to center
var center = new THREE.Vector3( 0, 0, 0 );
var distanceFromCenter = groupBubbles.children[i].position.distanceTo( center );
var factorSpeed = distanceFromCenter * groupBubbles.children[i].size / 24000;
groupBubbles.children[i].translateOnAxis( groupBubbles.children[i].worldToLocal( center ), factorSpeed );
Note that Three.js uses SI distance units, so we have to find the right factor to adjust the speed of each sphere and produce the effect we want (here we divide it by 24 000).
Then we tell the labels to follow the position of the spheres they’re linked to, and adjust the scale of each label so that it fits in those spheres. We specified the positive z position of each label to be 1.1 times the size of the sphere, so the labels will always be on top. Another possible trick would have been to create a second THREE.Scene rendering immediately after the first one, so the labels be always rendered on top.
groupLabels.children[i].position.set( groupBubbles.children[i].position.x, groupBubbles.children[i].position.y, groupBubbles.children[i].size * 1.1 );
groupLabels.children[i].scale.set( groupBubbles.children[i].size * 2 * groupBubbles.children[i].scale.x, groupBubbles.children[i].size * 2 * groupBubbles.children[i].scale.x, 1 );
In the second loop we’ll check for collisions, and move the spheres accordingly. To avoid checking multiple times each sphere, and a sphere against itself, we’ll use nested loops incrementing the index of the outside loop by 1, as in the code below.
A collision will be detected if the distance between two spheres is lower than their added radius. The difference between this two parameters will be a variable, called “overlap” here, that will be used to store the distance we’ll need to move two spheres from each other.
for (var i = 0; i < data.length-1; i++) {
	for (var j = i+1; j < data.length; j++) {
		if ( i !== j && groupBubbles.children[i].position.distanceTo( groupBubbles.children[j].position ) < groupBubbles.children[i].size + groupBubbles.children[j].size ) {
			var overlap = Math.abs( groupBubbles.children[i].position.distanceTo( groupBubbles.children[j].position ) - groupBubbles.children[i].size - groupBubbles.children[j].size );
			// move the spheres
		}
	}
}
I first tried to move the spheres away from each other using the translateOnAxis method wrote before. The first sphere had the second sphere for target, and vice-versa, but I found it inefficient in term of speed and it produced random artefacts (I may be missing something here).
So I used the built-in lookAt function instead. There must be a better way to move a sphere without rotating the whole geometry of each mesh each time spheres collide, but for now it works smoothly as it is.
When two spheres intersect, they look at each other and gently move back half the distance they overlap. Because we want our dynamic system to stabilize at some point, it’s important that this value can be reduce to 0 over time. We also remind our spheres to stay at 0 on the z axis so they don’t try to reach the center climbing over their mates.
groupBubbles.children[i].lookAt( groupBubbles.children[j].position );
groupBubbles.children[j].lookAt( groupBubbles.children[i].position );
groupBubbles.children[i].position.z = 0;
groupBubbles.children[j].position.z = 0;
groupBubbles.children[i].translateZ( -overlap/2 );
groupBubbles.children[j].translateZ( -overlap/2 );
EDIT : Here’s a more efficient way of doing it using normalized direction :
var direction = groupBubbles.children[i].position.clone().sub( groupBubbles.children[j].position ).normalize();
groupBubbles.children[i].position.add( direction.clone().multiplyScalar( overlap/2 ));
groupBubbles.children[j].position.sub( direction.clone().multiplyScalar( overlap/2 ));

To interact with our data (or here, just play with the dynamic system we’ve created) we add a basic raycaster so the first mesh meeting the ray emitted from the camera towards the mouse cursor will have an emissive value. This setup is already well documented.
We also listen to the click events so that the size of the clicked element increases by *1.6 and pushes away the other spheres to get more space. Note that we have a size parameter independent from the scale of the sphere, used for collision, so in this case the geometry representing the data won’t scale up:
function onMouseMove( event ) {
mouse.x = ( event.clientX / window.innerWidth ) * 2 - 1;
mouse.y = - ( event.clientY / window.innerHeight ) * 2 + 1;
raycaster.setFromCamera( mouse, camera );
var intersects = raycaster.intersectObjects( groupBubbles.children );
if ( intersects.length > 0 ) {
	if ( INTERSECTED != intersects[ 0 ].object ) {
		if ( INTERSECTED ) INTERSECTED.material. emissive.setHex( INTERSECTED.currentHex );
			INTERSECTED = intersects[ 0 ].object;
			INTERSECTED.currentHex = INTERSECTED.material. emissive.getHex();
			INTERSECTED.material. emissive.setHex( 0x3a3a3a );
		}
	} else {
		if ( INTERSECTED ) INTERSECTED.material. emissive.setHex( INTERSECTED.currentHex );
			INTERSECTED = null;
	}
}
function onClick() {
	if ( INTERSECTED != null ) {
		INTERSECTED.size *= 1.6;
	}
}
Inside our first animation loop, we add those lines to have the sphere smoothly scale down to its original size:
if ( groupBubbles.children[i].size > data[i].size/60+1 ) {
	groupBubbles.children[i].size /= 1.05;
} else {
	groupBubbles.children[i].size = data[i].size/60 + 1
}
That’s it, feel free to share your knowledge, I’m still learning so I may be missing some workarounds and tips.
Thank you, be sure to check the great work and experiments of Jim Vallandingham, and have fun.
Links :
Elastic collision
Text analyser
Three.js